在 medium 上看到一篇很赞的文章……无奈关键部分一律无法加载出来,挂了梯子也不行,很心塞。刚刚突然发现加载出来了,以防之后再次无法访问,所以搬运过来。
There are couple of articles on how to integrate Scrapy into a Django Application (or vice versa?). But most of them don’t cover a full complete example that includes triggering spiders from Django views. Since this is a web application, that must be our main goal.
What do we need ?#
Before we start, it is better to specify what we want and how we want it. Check this diagram:
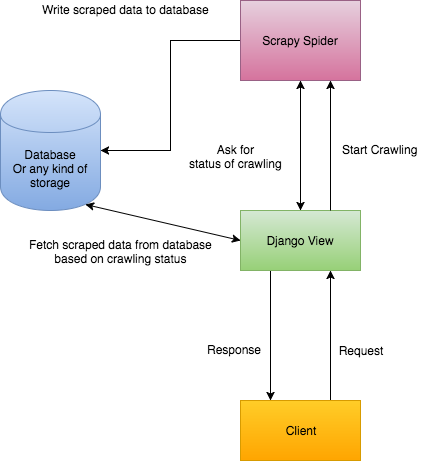
It shows how our app should work
- Client sends a request with a URL to crawl it. (1)
- Django triggers scrapy to run a spider to crawl that URL. (2)
- Django returns a response to tell Client that crawling just started. (3)
- scrapy completes crawling and saves extracted data into database. (4)
- django fetches that data from database and return it to Client. (5)
Looks great and simple so far.
A note on that 5th statement#
Django fetches that data from database and return it to Client. (5)
Neither Django nor client don’t know when Scrapy completes crawling. There is a callback method named pipeline_closed, but it belongs to Scrapy project. We can’t return a response from Scrapy pipelines. We use that method only to save extracted data into database.
Well eventually, in somewhere, we have to tell the client :
Hey! Crawling completed and i am sending you crawled data here.
There are two possible ways of this (Please comment if you discover more):
We can either use web sockets to inform client when crawling completed.
Or,
We can start sending requests on every 2 seconds (more? or less ?) from client to check crawling status after we get the "crawling started" response.
Web Socket solution sounds more stable and robust. But it requires a second service running separately and means more configuration. I will skip this option for now. But i would choose web sockets for my production-level applications.
Let’s write some code#
It’s time to do some real job. Let’s start by preparing our environment.
Installing Dependencies#
Create a virtual environment and activate it:
1$ python3.5 -m venv venv
2$ source venv/bin/activate
3$ pip install django scrapy scrapyd python-scrapyd-api
Scrapyd is a daemon service for running Scrapy spiders. You can discover its details from here.
python-scrapyd-api is a wrapper allows us to talk scrapyd from our Python program.
Note: I am going to use Python 3.5 for this project
Creating Django Project#
Create a django project with an app named main :
1$ django-admin startproject iCrawler
2$ cd iCrawler && python manage.py startapp main
We also need a model to save our scraped data. Let’s keep it simple:
 1import json
 2from django.db import models
 3from django.utils import timezone
 4
 5class ScrapyItem(models.Model):
 6    unique_id = models.CharField(max_length=100, null=True)
 7    data = models.TextField() # this stands for our crawled data
 8    date = models.DateTimeField(default=timezone.now)
 9
10    # This is for basic and custom serialisation to return it to client as a JSON.
11    @property
12    def to_dict(self):
13        data = {
14            'data': json.loads(self.data),
15            'date': self.date
16        }
17        return data
18
19    def __str__(self):
20        return self.unique_id
Add main app into INSTALLED_APPS in settings.py And as a final step, migrations:
1$ python manage.py makemigrations
2$ python manage.py migrate
Let’s add a view and url to our main app:
详细代码
 1from uuid import uuid4
 2from urllib.parse import urlparse
 3from django.core.validators import URLValidator
 4from django.core.exceptions import ValidationError
 5from django.views.decorators.http import require_POST, require_http_methods
 6from django.shortcuts import render
 7from django.http import JsonResponse
 8from django.views.decorators.csrf import csrf_exempt
 9from scrapyd_api import ScrapydAPI
10from main.utils import URLUtil
11from main.models import ScrapyItem
12
13# connect scrapyd service
14scrapyd = ScrapydAPI('http://localhost:6800')
15
16
17def is_valid_url(url):
18    validate = URLValidator()
19    try:
20        validate(url) # check if url format is valid
21    except ValidationError:
22        return False
23
24    return True
25
26
27@csrf_exempt
28@require_http_methods(['POST', 'GET']) # only get and post
29def crawl(request):
30    # Post requests are for new crawling tasks
31    if request.method == 'POST':
32
33        url = request.POST.get('url', None) # take url comes from client. (From an input may be?)
34
35        if not url:
36            return JsonResponse({'error': 'Missing  args'})
37
38        if not is_valid_url(url):
39            return JsonResponse({'error': 'URL is invalid'})
40
41        domain = urlparse(url).netloc # parse the url and extract the domain
42        unique_id = str(uuid4()) # create a unique ID.
43
44        # This is the custom settings for scrapy spider.
45        # We can send anything we want to use it inside spiders and pipelines.
46        # I mean, anything
47        settings = {
48            'unique_id': unique_id, # unique ID for each record for DB
49            'USER_AGENT': 'Mozilla/5.0 (compatible; Googlebot/2.1; +http://www.google.com/bot.html)'
50        }
51
52        # Here we schedule a new crawling task from scrapyd.
53        # Notice that settings is a special argument name.
54        # But we can pass other arguments, though.
55        # This returns a ID which belongs and will be belong to this task
56        # We are going to use that to check task's status.
57        task = scrapyd.schedule('default', 'icrawler',
58            settings=settings, url=url, domain=domain)
59
60        return JsonResponse({'task_id': task, 'unique_id': unique_id, 'status': 'started' })
61
62    # Get requests are for getting result of a specific crawling task
63    elif request.method == 'GET':
64        # We were passed these from past request above. Remember ?
65        # They were trying to survive in client side.
66        # Now they are here again, thankfully. <3
67        # We passed them back to here to check the status of crawling
68        # And if crawling is completed, we respond back with a crawled data.
69        task_id = request.GET.get('task_id', None)
70        unique_id = request.GET.get('unique_id', None)
71
72        if not task_id or not unique_id:
73            return JsonResponse({'error': 'Missing args'})
74
75        # Here we check status of crawling that just started a few seconds ago.
76        # If it is finished, we can query from database and get results
77        # If it is not finished we can return active status
78        # Possible results are -> pending, running, finished
79        status = scrapyd.job_status('default', task_id)
80        if status == 'finished':
81            try:
82                # this is the unique_id that we created even before crawling started.
83                item = ScrapyItem.objects.get(unique_id=unique_id)
84                return JsonResponse({'data': item.to_dict['data']})
85            except Exception as e:
86                return JsonResponse({'error': str(e)})
87        else:
88            return JsonResponse({'status': status})
I tried to document the code as much as i can.
But the main trick is, unique_id. Normally, we save an object to database, then we get its ID. In our case, we are specifying its unique_id before creating it. Once crawling completed and client asks for the crawled data; we can create a query with that unique_id and fetch results.
And an url for this view:
 1from django.conf import settings
 2from django.conf.urls import url,static
 3from django.views.generic import TemplateView
 4from main import views
 5
 6urlpatterns = [
 7    url(r'^$', TemplateView.as_view(template_name='index.html'), name='home'),
 8    url(r'^api/crawl/', views.crawl, name='crawl'),
 9]
10
11# This is required for static files while in development mode. (DEBUG=TRUE)
12# No, not relevant to scrapy or crawling :)
13if settings.DEBUG:
14    urlpatterns += static.static(settings.STATIC_URL, document_root=settings.STATIC_ROOT)
15    urlpatterns += static.static(settings.MEDIA_URL, document_root=settings.MEDIA_ROOT)
Creating Scrapy Project#
It is better if we create Scrapy project under (or next to) our Django project. This makes easier to connect them together. So let’s create it under Django project folder:
1$ cd iCrawler
2$ scrapy startproject scrapy_app
Now we need to create our first spider from inside scrapy_app folder:
1$ cd scrapy_app
2$ scrapy genspider -t crawl icrawler https://google.com
i name spider as icrawler. You can name it as anything. Look -t crawl part. We specify a base template for our spider. You can see all available templates with:
1$ scrapy genspider -l
2Available templates:
3basic
4crawl
5csvfeed
6xmlfeed
Now we should have a folder structure like this:
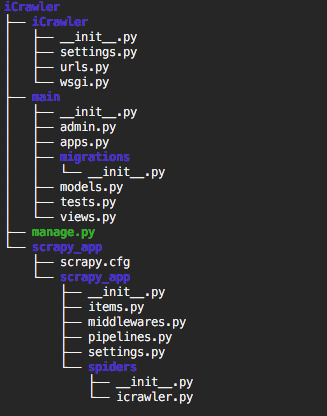
Connecting Scrapy to Django#
In order to have access Django models from Scrapy, we need to connect them together. Go to settings.py file under scrapy_app/scrapy_app/ and put:
 1import os
 2import sys
 3
 4# DJANGO INTEGRATION
 5
 6sys.path.append(os.path.dirname(os.path.abspath('.')))
 7# Do not forget the change iCrawler part based on your project name
 8os.environ['DJANGO_SETTINGS_MODULE'] = 'iCrawler.settings'
 9
10# This is required only if Django Version > 1.8
11import django
12django.setup()
13
14# DJANGO INTEGRATION
15
16## Rest of settings are below ..
That’s it. Now let’s start scrapyd to make sure everything installed and configured properly. Inside scrapy_app/ folder run:
1$ scrapydThis will start scrapyd and generate some outputs. Scrapyd also has a very minimal and simple web console. We don’t need it on production but we can use it to watch active jobs while developing. Once you start the scrapyd go to http://127.0.0.1:6800 and see if it is working.
Configuring Our Scrapy Project#
Since this post is not about fundamentals of scrapy, i will skip the part about modifying spiders. You can create your spider with official documentation. I will put my example spider here, though:
 1class IcrawlerSpider(CrawlSpider):
 2    name = 'icrawler'
 3
 4    def __init__(self, *args, **kwargs):
 5        # We are going to pass these args from our django view.
 6        # To make everything dynamic, we need to override them inside __init__ method
 7        self.url = kwargs.get('url')
 8        self.domain = kwargs.get('domain')
 9        self.start_urls = [self.url]
10        self.allowed_domains = [self.domain]
11
12        IcrawlerSpider.rules = [
13           Rule(LinkExtractor(unique=True), callback='parse_item'),
14        ]
15        super(IcrawlerSpider, self).__init__(*args, **kwargs)
16
17    def parse_item(self, response):
18        # You can tweak each crawled page here
19        # Don't forget to return an object.
20        i = {}
21        i['url'] = response.url
22        return i
Above is icrawler.py file from scrapy_app/scrapy_app/spiders. Attention to __init__ method. It is important. If we want to make a method or property dynamic, we need to define it under __init__ method, so we can pass arguments from Django and use them here.
We also need to create a Item Pipeline for our scrapy project. Pipeline is a class for making actions over scraped items. From documentation:
Typical uses of item pipelines are:
- cleansing HTML data
- validating scraped data (checking that the items contain certain fields)
- checking for duplicates (and dropping them)
- storing the scraped item in a database
Yay! Storing the scraped item in a database. Now let’s create one. Actually there is already a file named pipelines.py inside scrapy_project folder. And also that file contains an empty-but-ready pipeline. We just need to modify it a little bit:
 1from main.models import ScrapyItem
 2import json
 3
 4class ScrapyAppPipeline(object):
 5    def __init__(self, unique_id, *args, **kwargs):
 6        self.unique_id = unique_id
 7        self.items = []
 8
 9    @classmethod
10    def from_crawler(cls, crawler):
11        return cls(
12            unique_id=crawler.settings.get('unique_id'), # this will be passed from django view
13        )
14
15    def close_spider(self, spider):
16        # And here we are saving our crawled data with django models.
17        item = ScrapyItem()
18        item.unique_id = self.unique_id
19        item.data = json.dumps(self.items)
20        item.save()
21
22    def process_item(self, item, spider):
23        self.items.append(item['url'])
24        return item
And as a final step, we need to enable (uncomment) this pipeline in scrapy settings.py file:
1# Configure item pipelines
2# See http://scrapy.readthedocs.org/en/latest/topics/item-pipeline.html
3ITEM_PIPELINES = {
4    'scrapy_app.pipelines.ScrapyAppPipeline': 300,
5}
Don’t forget to restart
scrapydif it is working.
This scrapy project basically,
- Crawls a website (comes from Django view)
- Extract all URLs from website
- Put them into a list
- Save the list to database over Django models.
And that’s all for the back-end part. Django and Scrapy are both integrated and should be working fine.
Notes on Front-End Part#
Well, this part is so subjective. We have tons of options. Personally I have built my front-end with React. The only part that is not subjective is usage of setInterval . Yes, let’s remember our options: web sockets and to send requests to server every X seconds.
To clarify base logic, this is simplified version of my React Component:
详细代码
 1class Home extends React.Component {
 2  constructor(props) {
 3      super(props)
 4      this.state = {
 5          url: '',
 6          crawlingStatus: null,
 7          data: null,
 8          taskID: null,
 9          uniqueID: null
10      }
11      this.statusInterval = 1
12  }
13
14  handleStartButton = (event) => {
15    if (!this.state.url) return false;
16
17    // send a post request to client when form button clicked
18    // django response back with task_id and unique_id.
19    // We have created them in views.py file, remember?
20    $.post('/api/crawl/', { url: this.state.url }, resp => {
21        if (resp.error) {
22            alert(resp.error)
23            return
24        }
25        // Update the state with new task and unique id
26        this.setState({
27            taskID: resp.task_id,
28            uniqueID: resp.unique_id,
29            crawlingStatus: resp.status
30        }, () => {
31            // ####################### HERE ########################
32            // After updating state,
33            // i start to execute checkCrawlStatus method for every 2 seconds
34            // Check method's body for more details
35            // ####################### HERE ########################
36            this.statusInterval = setInterval(this.checkCrawlStatus, 2000)
37        });
38    });
39  }
40
41  componentWillUnmount() {
42      // i create this.statusInterval inside constructor method
43      // So clear it anyway on page reloads or
44      clearInterval(this.statusInterval)
45  }
46
47  checkCrawlStatus = () => {
48      // this method do only one thing.
49      // Making a request to server to ask status of crawling job
50      $.get('/api/crawl/',
51            { task_id: this.state.taskID, unique_id: this.state.uniqueID }, resp => {
52          if (resp.data) {
53              // If response contains a data array
54              // That means crawling completed and we have results here
55              // No need to make more requests.
56              // Just clear interval
57              clearInterval(this.statusInterval)
58              this.setState({
59                  data: resp.data
60              })
61          } else if (resp.error) {
62              // If there is an error
63              // also no need to keep requesting
64              // just show it to user
65              // and clear interval
66              clearInterval(this.statusInterval)
67              alert(resp.error)
68          } else if (resp.status) {
69              // but response contains a `status` key and no data or error
70              // that means crawling process is still active and running (or pending)
71              // don't clear the interval.
72              this.setState({
73                  crawlingStatus: resp.status
74              });
75          }
76      })
77  }
78
79  render () {
80    // render componenet
81    return (<div></div>)
82  }
83}
You can discover the details by comments i added. It is quite simple actually.
Oh, that’s it. It took longer than i expected. Please leave a comment for any kind of feedback.